Home / Getting Started Guide / Instructions / Template FAQs / What's Included / Extra Pages / Tutorials / FrontPage Starter Skills / Editable Files / About Customization / About Accessibility
Important Points to ease the learning curve
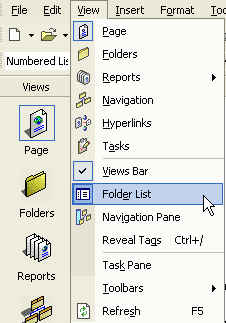
- If you are new to using FrontPage, always have the
"Folder List" turned on, and "View Bars"
so you can easily find the pages and folder in your web
site.
- to turn the folder view on, Click on the View menu,
locate the "Folder List" option, and ensure
the icon is depressed.
- FrontPage has an excellent help system built in

Just type in your question to access the help information.
Installing your
web site:
Note: this process only installs the necessary files
to create a web site template, you will need to proceed
to the next step (Creating a new web site) before
you are able to open and edit your web site
- Once you have downloaded your web site, locate the
installation file on your hard drive,
- Double click
the file to start the installation process. The web site
files will be added to your Microsoft office directories,
and shared folders. The installation package does not
create a directory for your web site. This is done in
the next step, Creating a new web site with your new
template.
- On the File menu, point
to New, and then click
Page or Web.

- In the New Page
or Web task pane, under
New from template,
click Web Site Templates.
- Click the web site template theme name located in
the template window.
- In the
Specify
the location of the new web box, type the URL for
the new web site, or click
Browse to create a new site on your hard disk, network,
or on the Internet. Mocrosoft recommends creating the
web site locally first, then uploading to your server.
-
Note To create a subweb, append the
name of the subweb to the name of the root web. For example:
http://adventure-works.com/subweb.
- Choose one of the following:
- If you want to add the site to the current web site,
select Add to current
Web.
- If you are creating a Microsoft FrontPage web on
a secure port of a Web server that supports
Secure Sockets Layer (SSL), select the
Secure
connection required (SSL) checkbox.
In Page view, do one the
following:
Method 1 - Create a page from an existing blank website page:
- In the "File" view, select the file you wish to
copy
- On the "Edit" menu select "copy"
- On the "Edit menu select "paste"
Method 2 - Create a page from a blank page (most
recommended)
- In the "File" view, select the file you wish to
copy
- On the "File" menu select "save as"
- You will be creating a copy of the original, give
this copy a name, and click OK
- Your copied page will be added to the folder list
- Locate the page in your Folder List
- Select the page, and press the delete key on your
keyboard.
- You can also delete a web page from the Navigation
window, by selecting the page in Navigation view, right
click, choose delete, and the second option presented,
"delete this page from web".
Method one:
- Find the page in your folder list
- Select the page, right click, choose "rename", type
in the new name, and then add the extension (.htm)
Method two:
- Click on the Folders icon, from the "Views" menu (right
hand side).
- to edit pages located in the root of your web site,
click on the top folder (c:\Documents and Settings\.....)
- select the page in the Folders window
- right click, and select "rename"
- press your "tab" key to move the focus to the page
"Title" then change the name
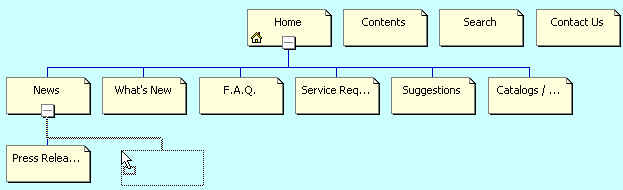
- Access the Navigation window by clicking on the Navigation
button in the views menu

- Drag your new page into the navigation window, and
drop it to create a "top level" page, or drag it underneath
an existing page to add it to the navigation structure.
- Select the new page, right click on the page title,
and enter the name you would like displayed on for the
menu buttons link
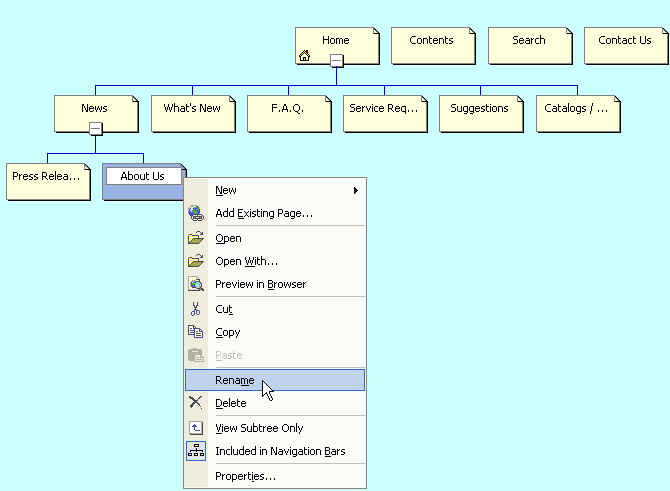
- As in the example above, "About Us" will be displayed
as the menu button name. The title of the page in the
navigation view does not need to be the same as the name
of the page. You could give your page a title such as
"About Us" yet, name the htm page "about.htm"
All of our templates us Cascading Style Sheets. This
helps to conform the text on each page, to be the same.
It also sets the size of the text, font style, font type,
and color. Using CSS is very important for maintaining the
structure of your tables that contain text. What you type
into your table and see in your browser, would not always
be the same thing that your visitors sees, if it weren't
for CSS.
Some additional information on adjusting the CSS in your
web site:
To modify a style that is contained in an external cascading
style sheet (CSS), do the following:
Notes
- If you're familiar with CSS syntax, you can edit
the text of the CSS directly on the style sheet in
Page view.
- This procedure works for both a style sheet you
create and for a CSS generated for a theme.
Edit an embedded CSS
In
Page view, do one or
both of the following:
Modify a style
- From the Normal
pane, click the Format
menu, and then click Style.
- In the List box,
click the type of style you want to modify.
- To modify a style you created, click
User-defined
styles.
- To modify a standard HTML tag, click
All HTML tags.
- In the Styles
list, double-click the style you want to modify.
- Under Style type,
choose Paragraph
or Character.
- Click Format,
and then specify the attributes you want to format:
- To set font properties — such as the font family
or color, or character spacing — click
Font.
- To set alignment, indentation, or spacing, click
Paragraph.
- To set borders and shading, click
Border.
- To set the style of bullets and numbering, click
Numbering.
- To set positioning properties — such as wrapping
style, location, or z-order — click
Position.
- Close all dialog boxes to return to the page.
Create a user-defined style
- From the Normal
pane, click the Format
menu, and then click Style.
- Click New, and then
in the Name (selector)
box, type a name for the user-defined style.
- Under Style type,
choose Paragraph
or Character.
- Click Format,
and then specify the attributes you want to format:
- To set font properties — such as the font family
or color, or character spacing — click
Font.
- To set alignment, indentation, or spacing, click
Paragraph.
- To set borders and shading, click
Border.
- To set the style of bullets and numbering, click
Numbering.
- To set positioning properties — such as wrapping
style, location, or z-order — click
Position.
- Close all dialog boxes to return to the page.
- The flash animations included with the FrontPage template
pages can easily be removed by selecting them while in
page view, then pressing the delete key on your keyboard.
A background image will be displayed, and you can add
text or images into the cell where the flash animation
was.
Please check with your ISP to ensure that your hosting
plan has the FrontPage extensions, and they are activated.
Most web host do, but you need to manually activate them
through your web site control panel, usually by logging
into your hosting account on-line.
If you are using FrontPage 2002, many hosts are still
using FrontPage 2003 server extensions as the default. You
will need to ensure that your FrontPage 2002 extensions
are enabled if you wish to take advantage of the added benefits
of FP2002.
Here is the process involved with publishing your web
site:
If your Internet service provider (ISP) has the Microsoft
FrontPage Server Extensions or SharePoint Team Services
from Microsoft installed, you can publish to the Web server
using HTTP. Otherwise, you can use Microsoft FrontPage to
publish your web site to an FTP server.
Note If you publish to a location
on your local computer, your web site will not have the
full FrontPage functionality unless your computer is a server
that has the server extensions or SharePoint Team Services
installed.
Choose one of the following:
Publish to a Web server (HTTP)
- On the File menu,
click Publish Web.
- In the Publish
Destination dialog box, do one of the following:
- Type the location of a Web server.
- Click the arrow to select a location to which
you have already published another web site.
- Click Browse to
find the publishing location.
Note If you have previously chosen
a publishing destination for this web site, the
Publish Destination
dialog box will not appear. Proceed to step 4.
- Click OK.
- Specify the pages you want to publish.
How?
- In the Publish
Web dialog box, click
Options in the
lower left corner.
- Click the Publish
tab, and do one or more of the following:
- Under Publish,
specify whether you want to publish only pages
that have changed, or all pages.
- Under Changes,
specify how you want Microsoft FrontPage to determine
which pages have been changed.
- If you want to create a log file for changes
made during publishing, select that check box.
- Click OK.
- To publish subwebs, select the
Include subwebs
check box.
- Click Publish.
FrontPage publishes your web site to the Web server
you specified. If you want to verify that your web site
was successfully published, click the hyperlink that
is displayed after the web has been published — your
web browser will open to the site you just published.
Note If you cancel publishing
in the middle of the operation, files that have already
been published remain on the destination Web server.
Publish to an FTP server
- On the File menu,
click Publish Web.
- In the Publish
Destination dialog box type the location of the
FTP server, or click the arrow to select a location
to which you have already published another web site.
Note If you have previously chosen
a publishing destination for this web site, the
Publish Destination
dialog box will not appear. Proceed to step 4.
- Click OK.
- Specify the pages you want to publish.
How?
- In the Publish
Web dialog box, click
Options in the
lower left corner.
- Click the Publish
tab, and do one or more of the following:
- Under Publish,
specify whether you want to publish only pages
that have changed, or all pages.
- Under Changes,
specify how you want FrontPage to determine which
pages have been changed.
- If you want to create a log file for changes
made during publishing, select that check box.
- Click OK.
- To publish subwebs, select the
Include subwebs
check box.
- Click Publish.
FrontPage publishes your web site to the FTP server
you specified.
Note If you cancel publishing
in the middle of the operation, files that have already
been published remain on the destination Web server.
Publish to a location on your local computer
- On the File menu,
click Publish Web.
- In the Publish
Destination dialog box, do one of the following:
- Type the path — for example C:\My Website — to
the folder on your file system.
- Click Browse to
locate the folder.
Note If you have previously chosen
a publish destination for this web site, the
Publish Destination
dialog box will not appear. Proceed to step 4.
- Click OK.
- Specify the pages you want to publish.
How?
- In the Publish
Web dialog box, click
Options in the
lower left corner.
- Click the Publish
tab, and do one or more of the following:
- Under Publish,
specify whether you want to publish only pages
that have changed, or all pages.
- Under Changes,
specify how you want FrontPage to determine which
pages have been changed.
- If you want to create a log file for changes
made during publishing, select that check box.
- Click OK.
- To publish subwebs, select the
Include subwebs
check box.
- Click Publish.
Note If you cancel publishing in
the middle of the operation, files that have already been
published remain on the destination folder.